

 One app for all your study abroad needs


Fire, smoke, coughing and spiked hair are not the only consequences that one may get by performing an intensive science experiment, especially one with chemicals. You must have seen in Dexter’s Laboratory that mere mixing of two chemicals or substances can result in a blast, but that’s a rather dramatic representation, to begin with! There are various scientific experiments that you can perform with simple household products and understand concepts that actually took years to be ideated. So, fetch your lab coat as we bring you a list of 10 interesting science experiments for class 6 that you can perform at home.
This Blog Includes:
- Top 18 Interesting Science Experiments for Class 6
- Bouncing Egg Experiment
- Light Travels Only in a Straight Path
- Different Sizes of Shadows
- Burning of Paper is a Chemical Change
- Saturated Solution
- Difference Between Like and Unlike Poles of a Magnet
- Transportation of Water in Plants
- The Stem of a Plant Always Grows Upward
- Difference Between Transparent and Opaque Materials
- Oxygen is Necessary for Fire
- Study of Sound Waves Using a Spoon
- Turning a Potato into a Battery
- Let’s Put an Egg in a Bottle
- Experiment using Naked Eggs
- Magic Water Balls
- Make a Hot Air Balloon
- Dry Ice Boat
- Build a Wind Vane
- Conclusion
- FAQs
Top 18 Interesting Science Experiments for Class 6
Curiosity and simple observations in science can go a long way. After all, it can lead to amazing discoveries. For class 6 students, science experiments can keep them engaged and make learning fun. Here we have listed some of the best scientific experiments for children that they can do using everyday materials. These experiments can explain the big ideas and spark excitement in the minds of young learners!
| S. No. | Experiment Name | Experminent |
| 1 | Bouncing Egg Experiment | Soaking an egg in vinegar dissolves the shell, making it bouncy and translucent. |
| 2 | Light Travels Only in a Straight Path | Using candlelight and aligned holes in cardboard shows that light moves in straight lines. |
| 3 | Different Sizes of Shadows | A torch and cardboard show how distance affects the size of shadows. |
| 4 | Burning of Paper is a Chemical Change | Burning paper produces ash, indicating that it undergoes a chemical change. |
| 5 | Saturated Solution | Adding sugar to water until it no longer dissolves demonstrates saturation. |
| 6 | Difference Between Like and Unlike Poles of a Magnet | Bar magnets show repulsion of like poles and attraction of unlike poles. |
| 7 | Transportation of Water in Plants | Colored water rises through a plant stem, showing water transport. |
| 8 | The Stem of a Plant Always Grows Upward | A plant pot placed upside down shows that stems grow upward toward light. |
| 9 | Difference Between Transparent and Opaque Materials | Glass allows light through, but wood blocks it, showing transparency vs opacity. |
| 10 | Oxygen is Necessary for Fire | A candle covered by a jar extinguishes due to a lack of oxygen. |
| 11 | Turning a Potato into a Battery | Potatoes with copper and zinc electrodes generate electricity to light a bulb. |
| 12 | Study of Sound Waves Using a Spoon | Vibrating spoons tied with a string to the ears demonstrate how sound travels. |
| 13 | Let’s Put an Egg in a Bottle | Heated air in a bottle pulls a boiled egg inside when cooled. |
| 14 | Experiment using Naked Eggs | Shelled eggs in syrup or water shrink or swell due to osmosis. |
| 15 | Magic Water Balls | Water balls in water disappear due to a matching refractive index. |
| 16 | Dry Ice Boat | Adding dry ice to water makes mini boats move due to the release of carbon dioxide. |
| 17 | Make a Hot Air Balloon | A plastic bag balloon rises when heated with candles and foil. |
| 18 | Build a Wind Vane | A homemade wind vane shows wind direction using arrows and a compass. |
Bouncing Egg Experiment
We know how fragile eggs are; even a slight bump or jerk can cause the shell to crack. Through this simple science experiment for class 6, we will tell you how you can make an egg bouncy.

To start, you will need an egg and a bowl filled with white vinegar. Immerse the egg in the bowl and then leave it at room temperature for around 3-4 days. Later on, you will see that the egg has become translucent in its appearance and is no more fragile than it used to be.
Light Travels Only in a Straight Path
This science experiment for class 6th will explain to you how light only travels in a straight path. It is not feasible to determine the path of light in the day-to-day activities, but through this experiment, we can learn about it quickly. For this, you need to light a candle and place two cardboard sheets adjacent to it, one behind the other. Make one hole in both the cardboards exactly at a place where you can see the flame of the candle. Turn off the light,s and you will be able to see the rays emerging from the candle will go straight into those holes.
Different Sizes of Shadows
We know that all the opaque objects have shadows. You must also come across that we see various types of shadows in different lighting. Have you ever thought why a certain shadow is bigger or another one is smaller? For this Class 6 science experiment, take a torch and a circular piece of cardboard and stand in front of a wall.
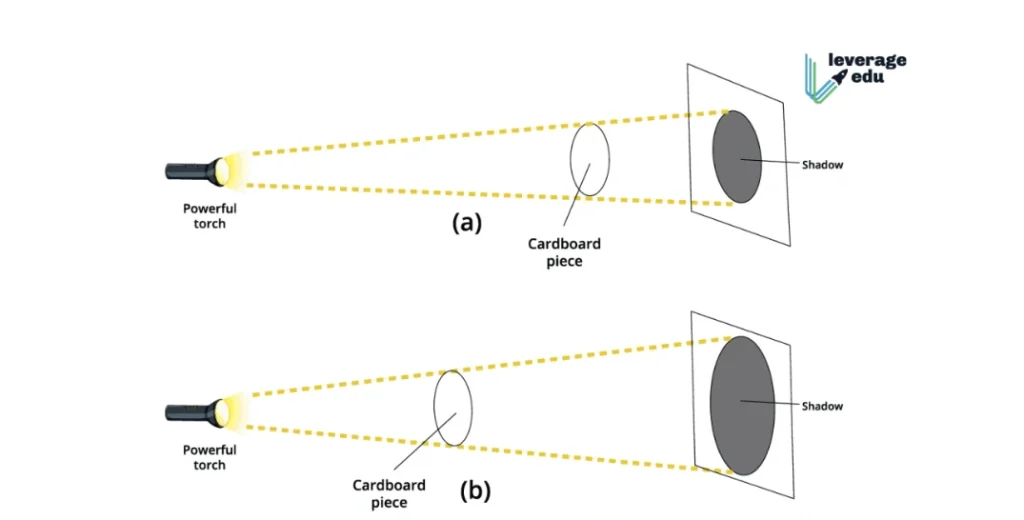
Place a circular piece closer to the wall and direct the light of the torch towards it, and then move the piece of cardboard closer to the torch. You will see in the former case that the shadow of the cardboard is almost equal to its original size, but in the latter case, when the cardboard is closer to the torch, the shadow is enlarged.
Burning of Paper is a Chemical Change
In the sixth standard, students are memorized to various types of changes that take place around us. Out of all the science experiments for class 6 on types of changes, through this on, studentse will understand how the simple act of burning paper is a chemical change. Take a normal paper and light a matchstick to burn it. Make sure that you take the help of an adult while burning the paper to ensure that all the required precautions are taken. Note that once the paper is completely burnt, only ashes will be left behind. Since the burning of paper has resulted in the formation of a new substance, it is classified as a category of chemical change.
Saturated Solution
We know that water is known as a universal solvent. It can easily absorb the majority of soluble substances around us. In this science experiment for class 6, we will begin by taking a glass full of water and adding a spoonful of sugar in it. Mix sugar thoroughly and keep on adding by one spoon at a time after mixing. After some time, you will notice that no more sugar is getting dissolved in water. This signifies that water has reached its saturation point.
Difference Between Like and Unlike Poles of a Magnet
While playing with magnets, you might have experienced that, often, magnets do not get attracted if we try to do so. This is because, just as our planet Earth, magnets also have North and South poles.
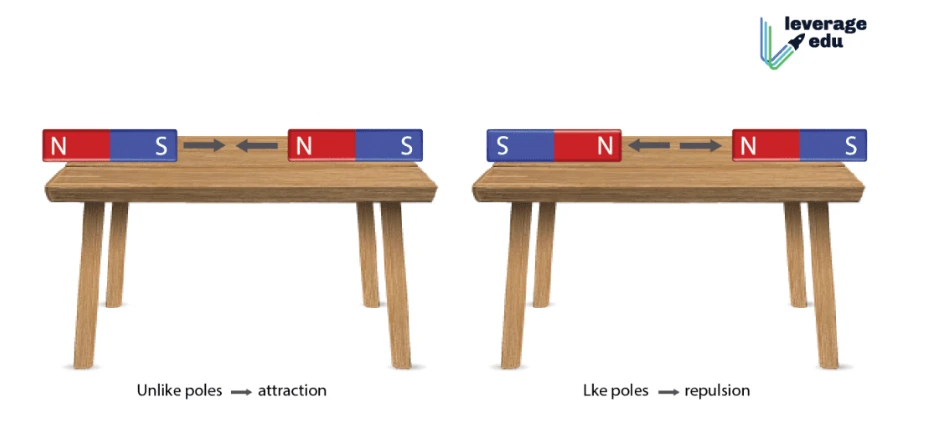
So, for our next science experiment for class 6, let’s begin by taking two bar magnets and keep them facing like poles that are N-N or S-S., You will see that like poles do not attract each other as they are repulsive. But when the same magnets are kept facing unlike poles together, N-S, they will immediately get attracted to each other.
Transportation of Water in Plants
Plants are also living organisms; thus, they possess a constant need for food as well as water. We know that plants are autotrophs and make their own food, but do you know how they transport water for the process of photosynthesis? To understand this, we will take a stem of a plant and cut it. In a bowl, we will take some coloured water, in which we will place the stem for about 2-3 days. You will notice that after a few days, the colour of the stem and leaves matches the colour of the water. This science experiment for class 6 shows that plants transport their water with the help of their stem.
The Stem of a Plant Always Grows Upward
Roots and stems are considered to be fundamental parts of the plant. Do you know that roots and stems grow in a particular direction? You will come across various science experiments for class 6, which will easily explain this to you.
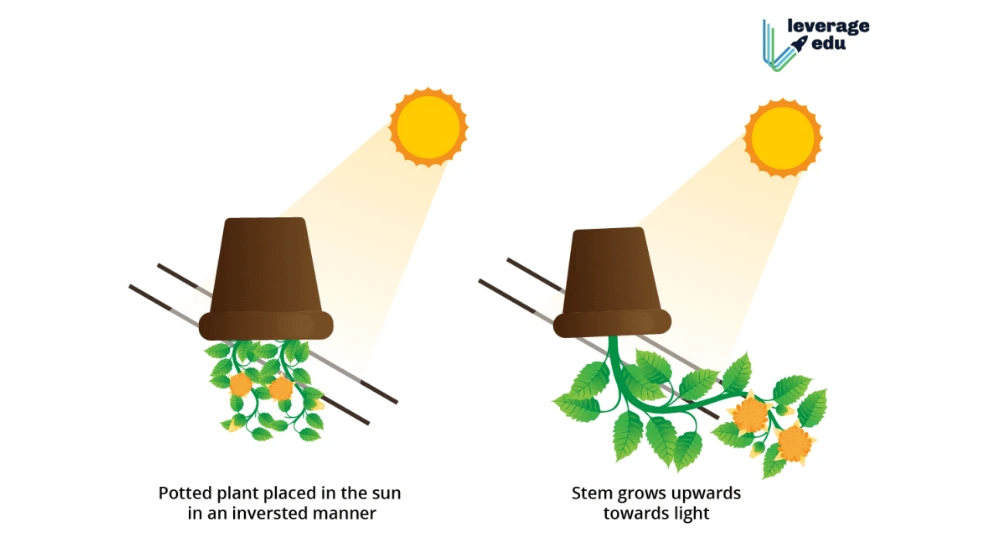
Let us consider a simple one: take any flower pot and place it upside down in sunlight for at least one week. After one week or 10 days, you will see that in spite of the downward direction placement the stem of the plant has changed its direction and has started to grow upwards.
Difference Between Transparent and Opaque Materials
We are surrounded by various sorts of materials which either allow light to pass through them or don’t. Among all the science experiments for class 6, this is the most interesting one, which will help us bifurcate materials into transparent and opaque. First, we will light up a candle, then take a glass jar and try to see that candle through it. You will be able to clearly see the candle as glass is a transparent material. Now, take a wooden log and try to see the candle through it. You will not be able to see it because wood is an Opaque material.
Oxygen is Necessary for Fire
Lighting a candle or simply lighting up anything is a common phenomenon of daily life. According to you, what is the essential thing required to light a fire? Don’t know the answer? Let’s explore it through this science experiment for class 6.
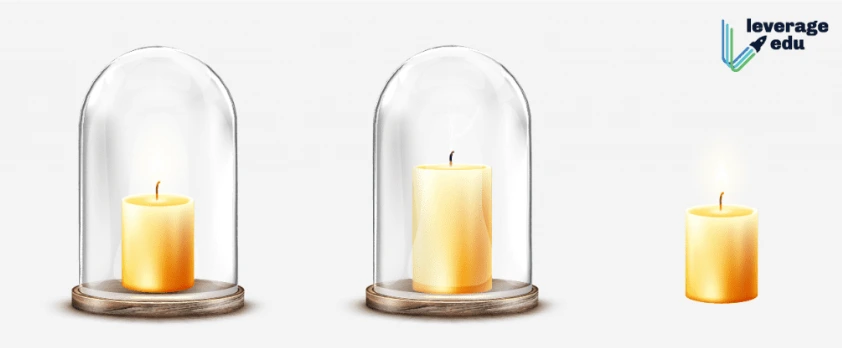
Begin by lighting up two candles. Place a glass jar on top of a candle that covers it entirely. After a while, you will notice that the flame of the candle covered with a glass jar will go out. This is because, in that covered jar, the amount of oxygen is limited and eventually gets exhausted, resulting in the going out. Thus, the most necessary thing for lighting a fire is oxygen.
Unique Fact: We all love to blow out candles on our birthdays. Oxygen is essential for the existence of fire, yet candles are blown out . This happens because the air that we blow out from our mouth contains carbon dioxide, which acts as a fire extinguisher.
Study of Sound Waves Using a Spoon
This class 6 experiment will help you study and learn about how vibrations create the sound as well as the role of conductors. You will only need a few common things like a ruler (preferably a wooden or plastic one), metal spoons of two different sizes, and a long piece of yarn or string. First of all, create a loop in the middle of the yarn or the string.
Now insert the end of the spoon into this loop. Pull each end of the yarn and tie a knot such that the spoon hangs in the. Now, take each string and start wrapping it around your forefinger in both hands. Now place the strings against your ears (near the ears) such that the spoon must be hanging below or near your waist, and both ends of the yarn or string must be placed near your ears. Now ask someone to hit the spoon with a ruler gently.
Turning a Potato into a Battery
Wow! This seems to be magic. Isn’t it? Well, guess what, it is just simple science. With this class 6 experiment, students will be able to learn the use of the potassium, which is present in the potatoes, to conduct electricity, which will turn potatoes into batteries. For this class 6 experiment, you require potatoes, good quality copper wires, galvanised nails, copper nails, and 1 LED bulb or light.
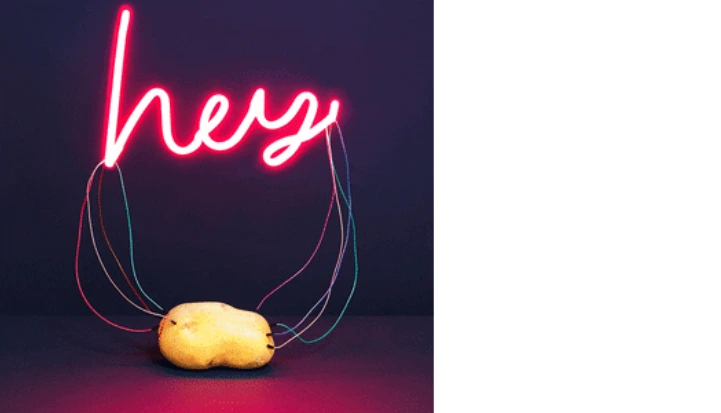
The experiment is an oldie but still considered to be a goodie. In this experiment, a potato acts as a natural electrolyte to produce electricity. When a copper nail and a zinc-coated nail are inserted into it, a chemical reaction generates a flow of electrons. By attaching wires from the nails to an LED bulb, the potato can light it up just like a simple battery. If you are not have potatoes at home, then the experiment can even be performed using lemons or other high-potassium fruits and vegetables.
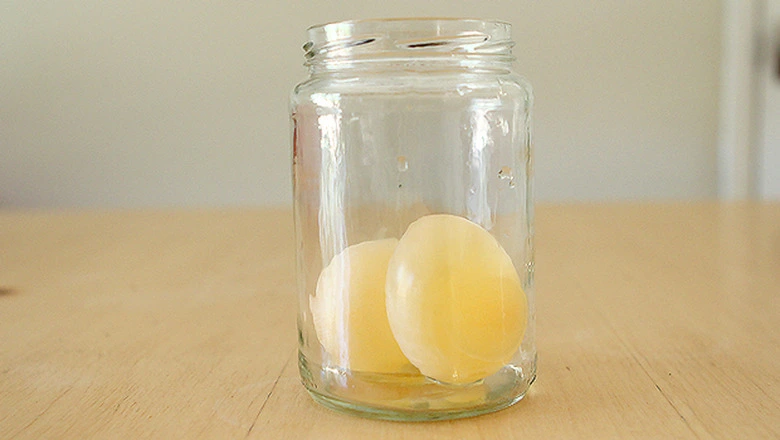
Let’s Put an Egg in a Bottle
This is yet another class 6 experiment, which is a classic again but never fails to delight the students and kids. You will only need a few things to perform this experiment, namely: a hard-boiled egg (peeled), a glass bottle having a mouth smaller than the egg, matches or a lighter and paper strips. The experiment is about keeping a burning paper strip inside a glass bottle. Thereafter, keeping a peeled boiled egg is set on its mouth. As the flame goes out, the air inside cools and creates lower pressure. The higher outside air pressure then pushes the egg into the bottle.
Experiment using Naked Eggs
Well, don’t just throw away those naked or the shell-less eggs that you have just discovered using the above-mentioned class 6 experiment.
Submerge those naked eggs into corn syrup and water, in separate vessels or glasses. Make sure that the eggs are completely submerged.You will notice that the eggs tend to shrink or grow depending on the liquid they are placed into.
Magic Water Balls
A simple science experiment for Class 6 students, the Magic Water Balls experiment needs a glass container, a cup of water balls and a bottle of water. Take the container, put it on paper with any text like ‘Magic Water Balls’ written on it and then fill the container with the water. As the balls start swimming into the water, you will start to see the text which happens as the refractive index of water matches that of the water balls and thus the text is visible!
Make a Hot Air Balloon
As one of the best science experiments for Class 6, making a hot air balloon at home can be a magical yet tricky task. For this, you will just need a tape, some straws, a pair of scissors and a big plastic bag to first make the balloon’s structure and then take some small birthday candles and a few square pieces of aluminium foil. Ask an adult to help you make the balloon as in the video, and then further attach the candles to the foil to make the base.
Dry Ice Boat
The Dry Ice Boat experiment is another fun one to do at home for Class 6 students. Here are the requirements for the Dry Ice Boat experiment:
- A wide tray
- 2 Pipettes
- Some food colours
- Dry ice
- One scissor
- Water to fill up the tray
- Hammer
- Safety gloves and glasses
Start by wearing the gloves and glasses first, and then fill the tray with water. Then, take some food colors and add it to the water to make it darker. Now, ask an adult to break the dry ice using a hammer. Now, add the little pieces of dry ice to the water, and you will see them revolving in circles. You can further extend the experiment by cutting a pipette into two pieces and then adding some ice to one of the pieces and putting them in the water.
Build a Wind Vane
A wind vane is a popular science project amongst school students and can be a fun DIY thing you can make for your room too! It is one of the best science experiments for Class 6, especially for those who don’t like working too long in the chemistry lab! So, let’s start with the requirements first. You will need the following things to build a wind vane:
- 2 paper plates
- Plastic straw
- A cardboard
- Scissors
- Some straight pins
- A pencil with an eraser on the top
- Clay
- Glue
- Compass
Start by writing directions on the back of the paper plates using a compass, and you can also decorate them with fun colours. Then, cut out the shapes of arrows from the cardboard and take a straw, cut its edges slightly to stick the direction arrows on both sides (refer to the video). Then, stick a pin right in the middle of the straw, and then stick it to the top of the pencil (on the eraser). Poke the pencil through your paper plate and put it in the modelling clay. Take another paper plate and put it under the clay, and paste the two plates together. Now, your wind vane is ready. Position it using a compass and blow on it to see how it works! Have fun!
Also Read: National Science Day Quiz
Conclusion
Science becomes an interesting subject for class 6th students when they can do experiments. These activities not only teach students the classroom concepts but are also helpful in building curiosity and critical thinking. Popular science experiments like bouncing eggs, homemade wind vanes, and dry ice boat spars wonder in the minds of children about how the world works. These everyday experiments help them to learn big scientific ideas in a fun and safe way.
FAQs
The best science experiment for class 6 students is a simple experiment that is safe and demonstrates a clear concept. For example, the bouncing egg experiment is a hands-on, fun experiment that explains about chemical reactions.
The best science experiment is one that can explain a universal principle. For example, oxygen is Necessary for fire. This experiment uses the basic materials and explains the essential fact of chemistry. This clarity makes this experiment suitable for lerners of all age groups.
The 6th-grade projects involve everyday science concepts such as magnetism, shadows, water transport in plants, and chemical vs physical changes. These experiments are known for encouraging curiosity and for building a foundation for higher-level science studies.
Newton’s prism experiment is the most famous scientific experiment. This experiment showcases how the white light splits into colors. Another popular experiment is the one by Galileo. Galileo’s falling bodies is an excellent test of gravity.
Young’s Double-Slit Experiment is considered he most beautiful scientific experiment. This experiment showcases how light can behave both as a particle and as a wave, and showcases g stunning interference patterns. This simple experiment is known for revealing facts about the nature of reality and quantum physics.
Related Articles:
Thus, now you have a list of amazing science experiments for class 6 that you can try at home and have fun while learning basic science concepts! Confused about finding the right career path? Our Leverage Edu experts are here to guide you at every step of your academic and professional journey! Sign up for a free session with us today!

 2,00,000+ students realized their study abroad dream with us. Take the first step today.
6 comments
Really use full
Hey Joe
Thank you for the comment!
i liked all of them thank you for sharing your ideas
Thank you!
Very useful & educative experiments Thank you very much. It was very useful for my students in our science club.
I would like to know more of chemistry and physics experiments for middle schoolers.
Thank you